quick review of Linux
quick review of Linux
- version: Ubuntu, RedHat, CentOS
- Environment Setup
- The root directory
- vim
- ip address and gateway
- systemctl
- commands
- UserCommand
- 文件权限
- disk
- shell
- 变量
- 流程控制
- read
- 提示 7 秒内, 读取控制台输入的名称
- 函数
- 归档文件应用
- 发送消息
version: Ubuntu, RedHat, CentOS
Environment Setup
-
virtual machine (vmware, Oracle VM VirtualBox)
- vmware: BIOS (F2, F10) -> enable Virtualization Technology
- internet
- NAT allows multiple hosts on a private network to access the internet using a single public IP address.
- 192.168.14.130 (windows)
- new address: 192.168.20.33 (windows)
- centos: 192.168.20.xxx
- cons: prevents IP address conflicts
- pros: cannot talk to each other
- Bridge mode is the configuration that disables the NAT feature on the modem and allows a router to function as a DHCP server without an IP Address conflict
- 192.168.14.100 (windows)
- centos: 192.168.14.xxx
- cons: devices connected to both routers can talk to each other
- pros: 192.168.14.0 ~ 192.168.14.255 only [256 - 3], limited ip address, may cause conflict
- Host only
- NAT allows multiple hosts on a private network to access the internet using a single public IP address.
-
centos system(Ubuntu)
- root password (search generate complex password) (16 chars)
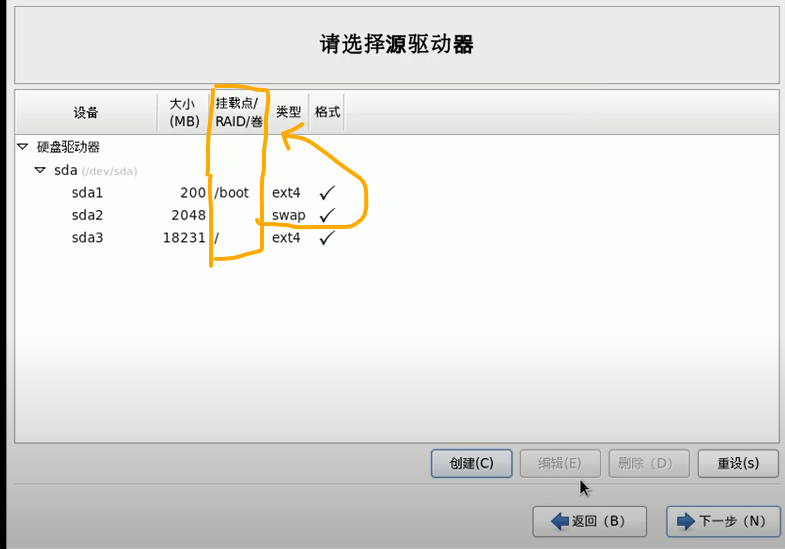
- custom layouts
-
- sda
-
- standard partition layout
-
- /boot 200MB
-
- swap 2048
-
- /

linux layout
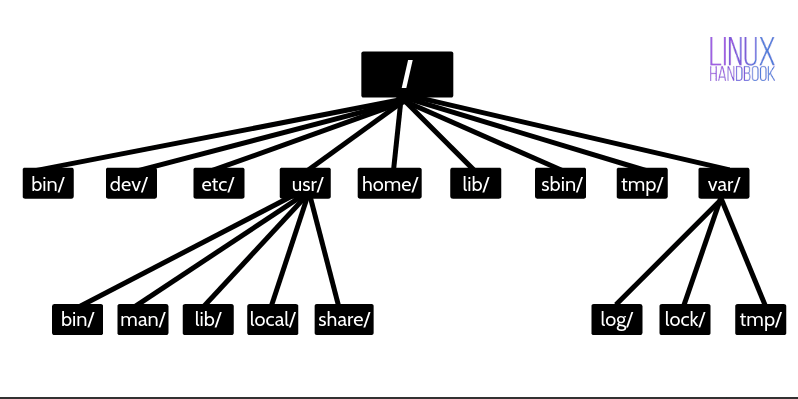
The root directory

directory structure
open terminal
[root@xxx ~] #
[root@xxx ~] # cd /
[root@xxx /] # ls
bins boot dev etc home ..
vim
[root@xxx ~] # cd aa/
[root@xxx aa] # vim bb.cfg
- i edit
- yy copy the current row
- nums yy (3 yy copy 3 rows)
- y copy Paragraph (y 8 y)
- y$ copy from current position to the end of line in vi
- p past
- nums p (5 p past 5 five times)
- u undo the last change
- dd delete the current row
- d delete n row (d$)
- x del
- X backspace
- yw copy one word
- dw delete one word
- shift + 6 move to row header
- :w save
- :q quit
- :wq save and quit
- :q! quit without save
- / n search next, N search above
- :s/old/new replace the first old to new
- :s/old/new/g replace all old to new
- :q! quit without save
ip address and gateway
[root@xxx ~] # ping www.google.com
host ip address
IPv4
virtual mathine to host ip address
[root@xxx ~] # ping 192.168.2.102
host ip address to virtual mathine
[root@xxx ~] # ifconfig
ens33: inet 192.168.111.129
window system: cmd
C:Users\riley> ping 192.168.111.129
setting up static IP address for virtual machine
-
图形化界面 -》 系统工具 -》 设置 -》 网络 -》有线 -》 IPv4 -》手动
-
root@xxx ~
[root@xxx ~] # vim /etc/sysconfig/network-scripts/ifcfg-ens33
hit Tab while typing a command, option, or file name and the shell environment will automatically complete what you’re typing or suggest options to you
BOOTPROTO=“dhcp” // 动态 ip
BOOTPROTO=“static”
快速移动光标到第四行, 4 shift + G
快速移动光标到单词 w
删除 dhcp, dw
i, 进入插入模式
IP address
IPADDR=192.168.202.100
GATEWAY=192.168.202.2
DNS1=192.168.202.2
change hostname
[root@xxx ~] # hostnamectl set- hostname yyy
[root@xxx ~] # hostname
会显示
yyy
hosts
[root@xxx ~] # vim /etc/host
[root@xxx ~] # vim /etc/hosts
127.0.0.1 localhost
::1

192.168.202.100 xxx
192.168.202.101 xx1
192.168.202.102 xx2
192.168.202.103 xx3
192.168.202.104 xx4
windows -> system32 -> drivers -> hosts
192.168.202.100 xxx
192.168.202.101 xx1
192.168.202.102 xx2
192.168.202.103 xx3
192.168.202.104 xx4
use SSH to Connect to a Remote Server in Linux
C:Users\riley>ssh root@xxx
systemctl
systemctl start | stop | restart | status 服务名
[root@xxx ~] # ls /usr/sbin/ |grep service
service
[root@xxx ~] # ls /usr/lib/systemd
centos 7 默认网络服务是 Networkmanager
所以网路如果不同,检查防火墙,虚拟机能 ping 通物理机, 但是虚拟机 ping 不通外网,都是 DNS
虚拟机 ping www.baidu.com 显示域名未知,检查 GATEWAY, DNS
最后关闭 network,启动 wetworkManager
擦看下他们的状态
[root@xxx ~] # systemctl status network
[root@xxx ~] # systemctl status NetworkManager
发现他们状态都是 active, 最好关掉上一个,避免冲突
[root@xxx ~] # systemctl stop network
[root@xxx ~] # systemctl restart network
commands
- pwd, (print working directory)shows current dir absolute path
- ls
- cd
[root@xxx ~] # cd /ect/sysconfig/
[root@xxx sysconfig] # cd /root/destop/
当 video 和 destop 在同一级上,就用相对路径
[root@xxx sysconfig] # cd ../video/
../ 是以当前目前的上一级的意思, 如果是绝对路径一定是 / 开头
- cd -
两个位置跳
[root@xxx ~] # cd /ect/sysconfig/
[root@xxx sysconfig] # cd -
/root
[root@xxx sysconfig] # cd -
/ect/sysconfig
-
su 切换用户
-
ls -a/-l
-
mkdir dirname (make directory)
-
mkdir -p g/h/i (根目录下创建 g, g 下面)
-
rmdir (remove directory)
-
rmdir -p g/h/i/ (删除根目录下 g, g 下面)
touch
cp cp-r
rm
删除文件夹
rm -rf a/
[root@xxx xxx] ls
aa bb cc
如果保留 xxx, 把里面的 3 文件全删除?
[root@xxx xxx] rm -f ./*
./表示当前目录
mv
- mv oldName newName
- mv /temp/movefile /targetfolder
cat
查看文件小行数短的文件
more
查看可以翻页的, space 翻到下一页,enter 下一行
less
echo
echo [选项][输出内容]
[root@xxx xxx] echo hello, world
hello, world
> »
· > 输出重定向 . »追加
- ls -l > file :列表的内容写入文件 a.txt 覆盖写
[root@xxx xxx] ls -l > aaa.text
- ls -l » file :列表的内容追加到文件 a.txt 末尾
[root@xxx xxx] ls -l » aaa.text
-
cat file 1 > file 2 :文件 1 内容覆盖到 文件 2
-
echo 内容 » file :内容追加到文件
head
- head 文件: 查看文件前 10 行
- head -n n 行
tail
- tail 文件: 查看文件后 10 行
- tail -n n 行
- tail -f : 追踪文章的所有更新
[root@xxx xxx] tail -f info
事实监控, 文件修改的话会显示出来
ln
-
ln -s[old file or dir][软连接名]
-
rm -rf 软连接名, 而不是 rm -rf 软连接名/, rm -rf 软连接名/ 会删除下面的内容
[root@xxx ]# ls aa.cfg bb cc
建立和 bb 的连接
[root@xxx ]# cd /home/folds/
[root@xxx folds]# ln -s /root/bb myInfo
[root@xxx folds]# ls
myinfo
点开 myinfo 和 bb 文件内容是一样的
- ln -s[old file or dir][软连接名]
连接文件或者文件夹
UserCommand
useradd
- useradd 用户名
- useradd -g 组名 用户名
[root@xxx ~]# cd /home
[root@xxx home]# ls
aaa
[root@xxx home]# useradd bb
[root@xxx home]# useradd -d /home/folder cc
passwd
- passwd 用户名
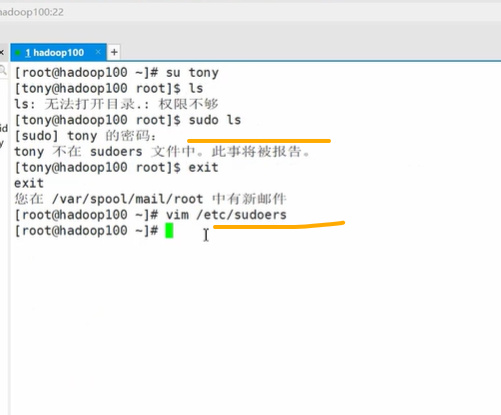
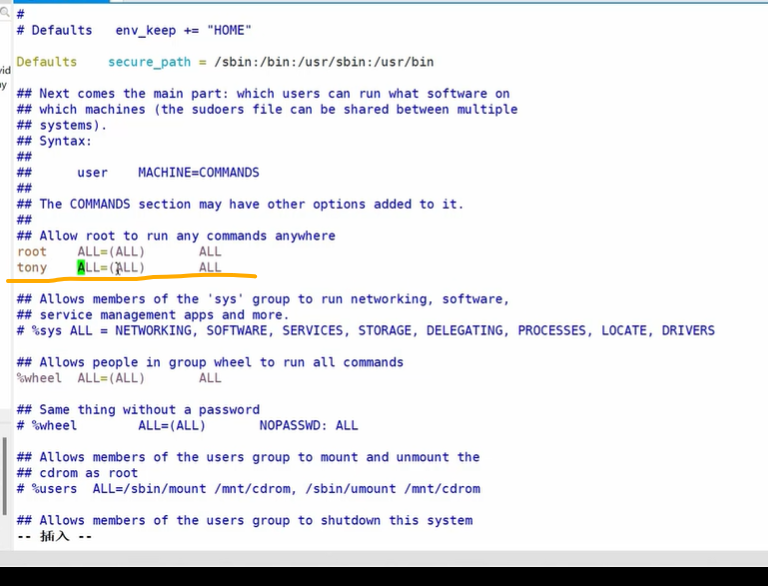
sudo 临时给用户加入管理员权限
在 root 权限下面复制,把 root 改为 用户

sudo

sudo
usermod 修改使用者的参数和资料
[aa@xxx root]$ id aa
uid=1000(aa) gid=1000(aa) group=1000(aa), 10(wheel)
10(wheel)是管理组,在里面的可以进行任何操作
[aa@xxx root]$ id root
uid=0(root) gid=0(root) group=0(root)
[aa@xxx root]$ id bb
uid=1001(bb) gid=1001(bb) group=1001(bb)
[aa@xxx root]$ id cc
uid=1002(cc) gid=1002(cc) group=1002(cc)
查看组
[aa@xxx root]$ sudo cat /etc/group
添加组
[root@xxx ]# groupadd zu
修改用户所在组
[root@xxx ]# usermod -g zu bb
[root@xxx ]# usermod -g zu cc
查看
[aa@xxx root]$ id bb
uid=1001(bb) gid=1003(zu) group=1003(zu)
[aa@xxx root]$ id cc
uid=1002(cc) gid=1003(zu) group=1003(zu)
修改组信息
[root@xxx ]# groupmod -n zuNewName zu
[aa@xxx root]$ id bb
uid=1001(bb) gid=1003(zuNewName) group=1003(zuNewName)
删除组
[root@xxx ]# groupdel bb
[root@xxx ]# groupdel cc
文件权限
chmod
- chmod [{ugoa}{+-=}{rwx}] 文件或目录
案例
[root@xxx ]# useradd -g bigdata xiaoming
[root@xxx ]# useradd -g bigdata xiaoliang
[root@xxx ]# useradd -g testing xiaohong
[root@xxx ]# useradd -g testing xiaolan
[root@xxx ]# cd /home
[root@xxx home]# ls
xiaoming xiaoliang xiaohong xiaolan
切换到小明
[root@xxx home]# su xiaoming
切换主目录
[xiaoming@xxx home]$ cd -
[xiaoming@xxx ~]$ ls
创建一个文件
[xiaoming@xxx ~]$ vim filea
查看权限
[xiaoming@xxx ~]$ ll
-rw-r–r–
退出,切换
[xiaoming@xxx ~]$ exit
切换到小亮
[root@xxx home]# su xiaoliang
[xiaoliang@xxx home]$ cd -
想进入小明目录
[xiaoliang@xxx home]$ cd ../xiaoming/
bash: …权限不够
修改权限
[xiaoliang@xxx ~]$ exit
[root@xxx home]# ll
drwx—— 5 bigdata .. xiaoming
[root@xxx home]# chmod g+x xiaoming/
切换到小亮
[root@xxx home]# su xiaoliang
[xiaoliang@xxx home]$ cd xiaoming/
[xiaoliang@xxx xiaoming]$ ll
ls:无法打开:权限不够, 因为 x 是进入,但是没有 r
[root@xxx home]# chmod g+r xiaoming/
查看
[xiaoliang@xxx xiaoming]$ cat filea
如果要修改,去小明用户那修改文件权限
find
- find -name
- find -user
- find -size
location
grep
“|” 将前一个命令的处理结果输出传递给后面的命令处理
-n 显示匹配行和行号
[root@xxx ~]# ls | grep -n test
关键词中的文件
[root@xxx ~]# grep -n aaa filea.cfg
[root@xxx ~]# ls | grep .cfg
gzip and gunzip
递归压缩
[root@xxx ~]# zip -r newfolder.zip /root
tar
tar -z 打包并压缩
[root@xxx ~]# tar -zcvf tar.gz filea fileb dir/
- -c 产生.tar 打包文件
- -v 显示详细信息
- -f 指定压缩后的文件名
[root@xxx ~]# tar -zcvf temp.tar.gz -C /tmp
- -x 解包 .tar 文件
- -C 解包到指定目录
disk
tree
[root@xxx ~]# yum install tree
[root@xxx ~]# tree ./
以 tree 查看层级结构
du
du: disk usage
-s 只显示总和, -a 目录还有文件
[root@xxx ~]# du -sh
-s 只显示总和
子目录深度
[root@xxx ~]# du –max-depth=1 -ah
shell
[root@xxx script]# vim a.sh
#!/bin/bash
echo "hello, world"
运行脚本
sh+ 脚本的相对路径
[aa@xxx script]$ sh ./hellowworld.sh
sh+ 脚本的绝对路径
[aa@xxx script]$ sh /home/aa/shells/hellowworld.sh
bash+ 脚本的相对路径
[aa@xxx script]$ bash ./hellowworld.sh
bash+ 脚本的相对路径
[aa@xxx script]$ bash /home/aa/shells/hellowworld.sh
直接输入脚本的相对或绝对路径
[aa@xxx script]$ ./hellowworld.sh
权限不够的话,加入 x 的权限
[root@xxx ~]$ chmod +x script/hellowworld.sh
[aa@xxx script]$ ./hellowworld.sh
source 更好的方式
[root@xxx script]# source /root/script/hellowworld.sh
[root@xxx script]# source hellowworld.sh
[root@xxx script]# . hellowworld.sh
变量
[root@xxx script]# a=2
[root@xxx script]# echo $2
2
[root@xxx script]# echo $my_var
[root@xxx script]# echo $my_var=hello
[root@xxx script]# echo $my_var
hello
运算符
[root@xxx script]# a=1+5
[root@xxx script]# echo $a
1+5
运算
[root@xxx script]# a=$((1+5))
[root@xxx script]# a=$[1+5]
[root@xxx script]# echo $a
5
计算
[root@xxx script]# expr 1 + 5
脚本计算
[root@xxx ~]# cd script/
[root@xxx script]# vim add.sh
#!/bin/bash
sum=$[$1 + $2]
echo sum
修改权限
[root@xxx script]# chmod +x add.sh
[root@xxx script]# ./add.sh 25 89
sum=114
条件判断
[root@xxx script]# a=hello
[root@xxx script]# test $a = hello
要返回值
[root@xxx script]# echo $?
0 // 0 是对
不用写 test, 直接用[], 注意空格
[root@xxx script]# a=hello
[root@xxx script]# [ $a = hello ]
用 test 测出某个文件是否有相应权限
[root@xxx script]# [ -r heelo.sh ]
[root@xxx script]# [ -r test ]
[root@xxx script]# echo $?
0 代表 有, 1 没有
用 test 判断是否存在
[root@xxx script]# [ -e /home/aa/info ]
[root@xxx script]# echo $?
- -e 是否存在
- -f 是不是文件
- -d 是不是目录
条件
[root@xxx script]# a=15
[root@xxx script]# [ $a - lt 20 ] && echo “$a < 20” || echo “$a >= 20”
[root@xxx script]#
上面类似 ? :
流程控制
if 单分支
- if; then
[root@xxx ~]# cd /home/aa/info/; ls -l
rw-r–r–, l root..
[root@xxx info]# cd ~
[root@xxx ~]# a=25
[root@xxx ~]# if [ $a -gt 18 ]; then echo OK; fi
用脚本控制
[root@xxx ~]# cd aa/
[root@xxx aa]# vim if_test.sh
#!/bin/bash
if $[ "$1"x = "aa" ]
then
    echo "welcome, aa"
fi
[root@xxx aa]# chmod +x if_test.sh
[root@xxx aa]# ./if_test.sh aa
“welcome, aa”
[root@xxx aa]# ./if_test.sh bb // 无效
判断出现在[] -a 代表[] && []
[root@xxx ~]# if [ $a -gt 18 -a $a -lt 38 ]; then echo OK; fi
if 多分支
#!/bin/bash
if [ "$1"x = "aa" ]
then
    echo "welcome, aa"
fi

# 输入第二个参数, 代表年龄,判断属于哪个年龄段
if [ $2 -lt 18 ]
then
    echo "未成年人"
else
    echo "成年人"
fi
[root@xxx aa]# ./if_test.sh aa 15
[root@xxx aa]# ./if_test.sh aa 35
elif 多分支
#!/bin/bash
if [ "$1"x = "aa" ]
then
    echo "welcome, aa"
fi

# 输入第二个参数, 代表年龄,判断属于哪个年龄段
if [ $2 -lt 18 ]
then
    echo "未成年人"
elif [ $2 -lt 35 ]
then
    echo "青年人"
elif [ $2 -lt 60 ]
then
    echo "中年人"
else
    echo "老年人"
fi
计算
[root@xxx aa]# a=3
[root@xxx aa]# if (($a > 2)); then echo OK; else echo notOK; fi
case 分支
[root@xxx aa]# vim case.sh
#!/bin/bash


case $1 in
1)
    echo "one"
# ;; = break;
;;
2)
    echo "two"
;;
3)
    echo "three"
;;
# *) = default;
*)
    echo "number 4"
;;
esac
[root@xxx aa]# chmod +x case.sh
[root@xxx aa]# ./case.sh 2
two
for 循环
for ((初始值; 循环控制条件;变量变化))
do
    程序
done
从 1 加到 100
[root@xxx aa]# vim sum.sh
#!/bin/bash


for (( i=1; i <= $1; i++))
do
    sum=$[ $sum + $i ]
done
echo $sum
[root@xxx aa]# chmod +x case.sh
[root@xxx aa]# ./case.sh 100
5050
更常见的 for
[root@xxx aa]# for os in linux windows macos; do echo $os; done
linux
windows
macos
从 1 加到 100
[root@xxx aa]# for 1 in {1..100}; do sum=$[$sum+$i]; done; echo $sum
5050
$* and $@
[root@xxx aa]# vim parameter.sh
#!/bin/bash

echo '===================$*================='
for para in $*
do
   echo $para
done

echo '===================$@================='
for para in $@
do
   echo $para
done
[root@xxx aa]# chmod +x parameter.sh
[root@xxx aa]# ./parameter.sh a b c d e
===================$*=================' br a br b .. e
===================$@=================' br a br b .. e
加入引号后
#!/bin/bash

echo '===================$*================='
for para in "$*"
do
   echo $para
done

echo '===================$@================='
for para in "$@"
do
   echo $para
done
[root@xxx aa]# ./parameter.sh a b c d e
===================$*=================' br a b c d e br ===================$@=================' br a br b .. e
"$*" 会把参数当作一个整体, 而$@ 则是当初独立个体
while
[root@xxx aa]# vim sum.sh
#!/bin/bash

a=1
while [ $a -le $1]
do
    sum2=$[ $sum2 + $a ]
    a=$[$a + 1]
done
echo $sum2
[root@xxx aa]# ./sum.sh 100
5050
更简便的写法 let
#!/bin/bash

a=1
while [ $a -le $1]
do
#   sum2=$[ $sum2 + $a ]
#   a=$[$a + 1]
    let sum2+=a
    let a++
done
echo $sum2
read
read (选项) (参数)
-
- 选项:
- -p: 指定读取值得提示符
- -t:指定读取值时等待的时间(秒) 如果-t 不加表示一直等待
-
- 参数:
- 变量
提示 7 秒内, 读取控制台输入的名称
#!/bin/bash

read -t 7 -p "Enter your name in 7 s :" name
echo "welcome, $name"
[root@xxx aa]# ./read.sh
Enter your name in 7 s: AA
welcome, AA
函数
系统函数
basename
#!/bin/bash

filename="$1"_log_$(date + %s)

echo $filename
非常有用的时间戳的文件名
[root@xxx aa]# basename ./cmd_test.sh YY
YY_log_156374785848
自定义函数
#!/bin/bash

function add() {
    s=$[$1 + $2]
    echo "和: "$s
}
read -p "请输入第一个整数" a
read -p "请输入第二个整数"b

add $a $b
return 返回,如果不加,将最后一条命令结果,返回值 n(0 - 255)
#!/bin/bash

function add() {
    s=$[$1 + $2]
    echo "和: "$s
}
read -p "请输入第一个整数" a
read -p "请输入第二个整数"b

sum=$(add $a $b)
echo "和: " $sum
echo "和平方: " $[$sum * $sum]
归档文件应用
需求: 实现一个每天指定目录归档备份的脚本,输入一个目录名称, 将目录下所有文件按天归档保存,并将归档日期附加在归档文件名上,放在 /root/archive 下。
[root@xxx aa]# vim daily_archive.sh
#!/bin/bash

# 首先判断输入参数个数是否为1

if [ $# -ne 1 ]
then
    echo "参数个数错误! 应该输入一个参数, 作为归档目录名"
    exit
fi

# 从参数中获取目录名称
if [ -d $1 ] {
then
    echo
else
    echo // 相当于空一行
    echo "目录不存在"
    echo
    exit
fi

// 获取绝对路径
DIR_NAME=$(basename $1)
DIR_PATH=$(cd $(dirname $1); pwd)

# 从获取当期日期
DATE=$(date + %y%m%d)

# 定义生成的归档文件名称
FILE=archive_${DIR_NAME}_$DATE.tar.gz
DEST=/root/archive/$FILE

# 开始归档目录文件
echo "开始归档..."
echo

tar -czf $DEST $DIR_PATH/$DIR_NAME

# 判断是否成功
if [ $? -eq 0 ]
then
    echo
    echo "归档成功"
    echo "归档文件为: $DEST"
    echo
else
    echo "归档出现问题"
    echo
fi

exit
[root@xxx aa]# chomod u+x daily_archive.sh
[root@xxx aa]# ll
用 bash, 所以不是 aa/
[root@xxx aa]# ./daily_archive.sh ../aa
// FILE=archive_${DIR_NAME}_$DATE.tar.gz
加入定时任务
[root@xxx aa]# crontab -e
# 每天凌晨2点钟执行脚本, /root/aa是一个参数
0 2 * * * /root/aa/daily_archive.sh /root/scripts
发送消息
利用自带的 mesg 和 write 工具,向其他用户发送消息
**需求:**实现一个向某个用户快递发送消息的脚本,输入用户名作为第一个参数,后面直接跟要发送的消息。 脚本需要检测用户是否登录在系统中,是否打开消息功能,以及当前发送消息是否为空。
[root@xxx scripts]# who root … aa …
aa 在线的时候可以发送
[root@xxx scripts]# mesg
is y
[root@xxx scripts]# who -T
root + pts/0
aa + pts/1
- 表示开启了消息
关闭消息
[root@xxx scripts]# mesg n
[root@xxx scripts]# who -T
root - pts/0
aa + pts/1
开启消息
[root@xxx scripts]# mesg y
[root@xxx scripts]# write aa pts/1
hello, aa
通过脚本
[root@xxx scripts]# vim send_msg.sh
#!/bin/bash

#查看用户是否登录
# -i,忽略大小写, -m最大数是第一个,有多个只选第一个
#awk -F':' ' {print $1}'表示以“:”分割字符串,打印第一个awk就是把文件逐行的读入,以空格为默认分隔符将每行切片,切开的部分再进行各种分析处
login_user=$(who | grep -i -m 1 $1 | awk '{print $1}')

# -z是否为空 zero
if [ -z $login_user ]
then
    echo "$1 不在线"
    echo "脚本退出"
    exit
fi

# 是否开启了消息
is_allowed=$(who -T | grep -i -m 1 $1 | awk '{print $2}')

if [ $is_allowed != "+" ]
then
    echo "$1 没有开启消息功能"
    echo "脚本退出"
    exit
fi

# 确认是否有消息发送
if [ -z $2 ]
then
    echo "没有消息发送"
    echo "脚本退出"
    exit
fi

# 从参数中获取要发送的消息
#截取以空格为分隔符, 第二列到后面 -d " " -f 2-
whole_msg=$(echo $* | cut -d " " -f 2-)


# 获取用户登录的终端
user_terminal=$(who | grep -i -m 1 $1 | awk '{print $2}')

# 写入要发送的消息
echo $whole_msg | write $login_user $user_terminal

if [ $? != 0 ]
then
    echo "发送失败"
else
    echo "发送成功"
fi

exit
